To get started on the Electrical Wiring Diagram, it’s important to know what components you’re going to use. You need to know how many solar panels you want to mount, if you are going to use a mains hook up, do you charge while driving and what your energy consumers are going to be. If this is still unclear it is best to read through the previous blog posts.
1. Before you can make a wiring diagram for your campervan
You want to create a simple and clear wiring diagram. The idea is that you can easily read how to connect the various devices. You will need the following information to do this:
- You need to know what devices you are going to install all together;
- You need to know where these devices will be installed;
- You need to know maximum power of each device;
- You need to know the distance from the appliance to your leisure battery.
The next step is to determine which wire sizes are appropriate for your devices.
2. Calculating the cable size
To calculate the cable size, we need two pieces of information:
- The maximum power (watts) of each device you connect. You can find this in the manual of the product, on the product itself, or on Google. To determine the cable size we need to convert the power (watts) to amperage (amps). We do this with the following formula: Watt : Volt = Amps. You can also use the calculator, then set daily consumption to 1 hour.
- The distance from your appliance to the leisure battery. There are always two cables going to your appliance: a positive and negative cable. To calculate the distance we always add the positive and negative cable together.
Example: Your inverter is 50 cm away from the leisure battery. In this case, the length you note for the cable calculation is 100 cm.
This process is complicated and time consuming. The Electrical Wiring Diagram has a built-in calculator; it calculates the wire- and fuse-size. In the end you get a clear overview of which parts you need to order. It also creates a clear diagram which makes the installation much easier.
If the cable lengths and current ratings are known you can do two things, manually start calculating all the cable sizes and fuses or purchase the Electrical Wiring Diagram.
Determining cable size
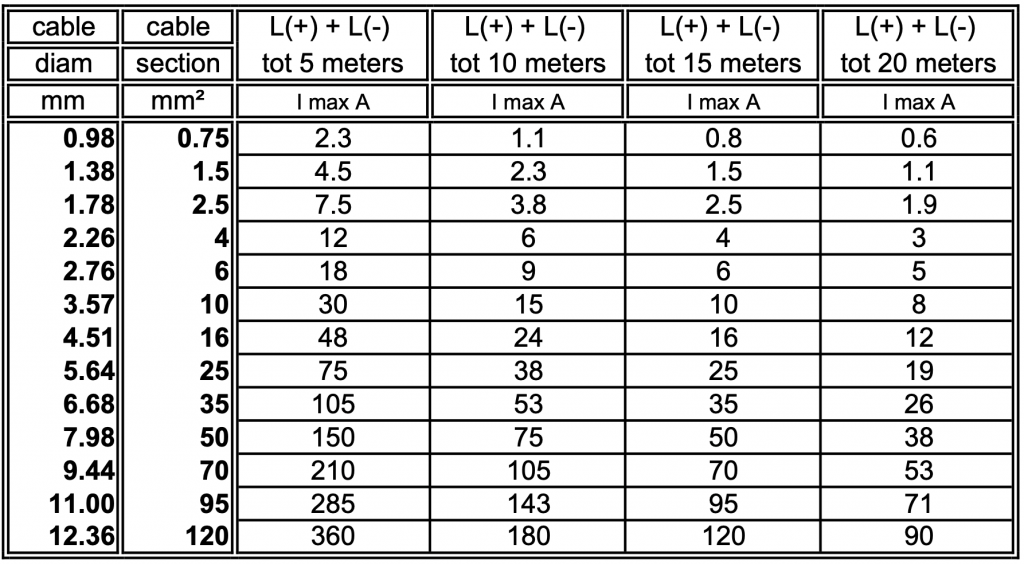
To calculate the right wire size, Victron has published a table. From this table you can determine which diameter is suitable for your device.
Example: you have a device that can handle a maximum load of 40 Amps. This is 2 meters away from your leisure battery, you need a total of 4 meters of cable. According to the table you can use a wire size of 16mm² for this device.
Types of wire & connection
In a moving vehicle, one uses braided copper wire; it is more flexible and better designed to withstand vibrations than “ordinary” copper wire, which you use at home. For the connection of 12 Volt applications this cable is an excellent choice: 2 core 2 x 2.5mm2.
For heavier equipment such as an inverter or charge controller, use battery cable. These cables vary in thickness from 6mm² to 95mm² and come in red (positive terminal) and black (negative terminal). If you use the Electrical Wiring Diagram, you will know exactly how many meters of cable, and of what thickness, you must purchase.
Tip: order ± 10% extra wire length, a mistake is easily made. Also, place your wires in a conduit for extra safety.
3. Fuses for your campervan wiring
Fuses are meant to protect your electrical circuit from short circuit, fire etc. If there is a short circuit or an overload, too much current will flow through the cable, and when the current reaches the height of the fuse, the fuse will blow or melt. If you do not install a fuse, the current will continue to rise and eventually the cable will burn out; a fire will occur.
Determining fuse size
To determine a fuse size, you need to know the maximum current allowed to flow through the wire. We’ll use the same example as with wire size; you have a device that can carry a maximum load of 40A. This device is located 2 meters away from your battery, you need a total of 4 meters of cable. According to Victons wiring diagram, you can use 16mm² wire for this device.
Looking at the Victron wiring diagram, we see that the maximum current that can pass through 16mm² cable is 48 amps. Therefore, the fuse should never exceed this number. Choosing the right fuse is done with the following calculation: Maximum device power * 1.2. In the example situation: 40 * 1.2 = 48A. This fuse does not exist so we choose the next size up: 50A; in this case we exceed the maximum current of the cable and we will have to choose the next cable thickness: 25mm².
In the Electrical Wiring Diagram this is automatically taken into account.
In short:
- Size of fuse = maximum power device * 1.2;
- Then choose the available fuse;
- After that, check that the fuse does not exceed the maximum current (Amps);
Placement of the fuse
It is important to place the fuse as close as possible to the source of energy. In the case of campervan electrics, this is your leisure and/or starter battery. If you are using the Electrical Wiring Diagram: place your fuses as close to the bus bar/distribution strip as possible. Place the main fuse as close to the leisure battery as possible.
If you’re using a lead acid battery, this fuse is ideal.
Different fuses
Fuse block
You know all the devices you want to connect, but they all need to be fused. For the ‘weaker’ devices like the USB chargers, refrigerator, diesel heater, etc a fuse block is usually used. You can connect up to 12 devices and you easily find a blown fuse. The nice thing about this model is that the plus and minus wires can be connected easily. It is also easy to make the connection to the battery.

Midi/Mega fuse holder
This type of fuse you place between the consumer (inverter, battery charger, etc) and the battery, or bus bar. This fuse uses the ‘old fashioned way’, you buy a holder and put your desired fuse in it. If the current becomes too high, the fuse melts and you have to replace it.
As a positive busbar we use this midi/mega fuse block, its ideal for distributing heavy load cables.
4. Electrical Wiring Diagram Campervan
If all goes well you now know the following:
- Which way(s) to charge your leisure battery;
- Which inverter is right for you;
- Which 12 volt applications you want to use;
- The places where all equipment will be placed;
- The length and diameter of your cables;
- The size of your fuses;
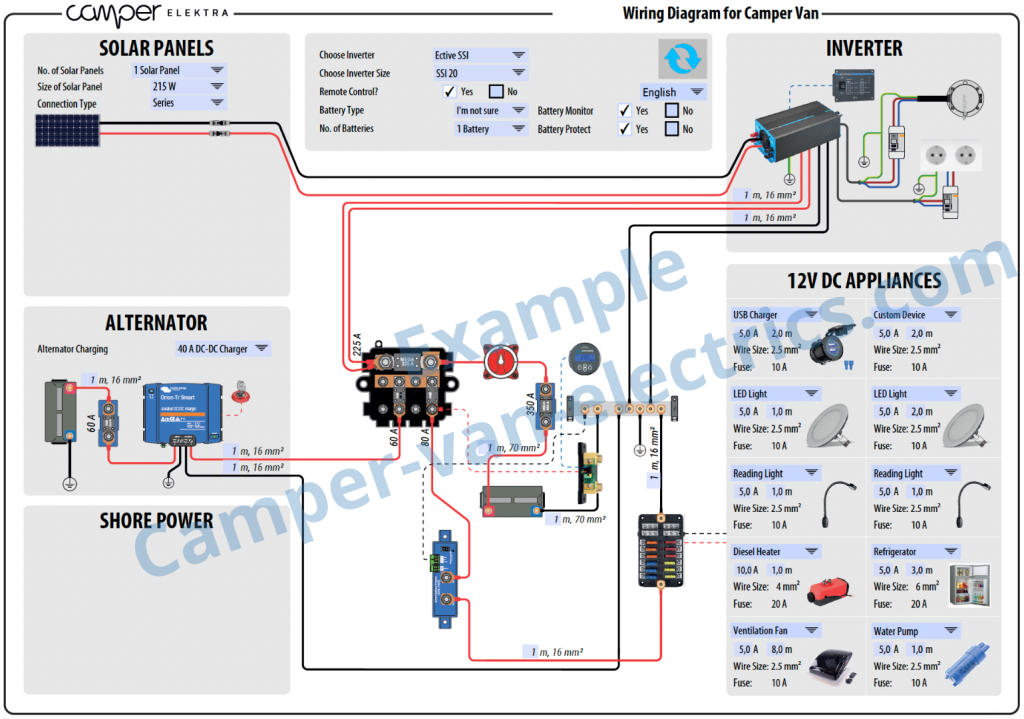
The next step is to draw your wiring digram, so you can easily see how everything should be connected. Is it too much work to calculate and draw everything? Then download your diagram here!
Shopping list
Then its almost time to start the wiring in your campervan, but before you can start you need a few tools and supplies. Here we have a list of the products we use(d):
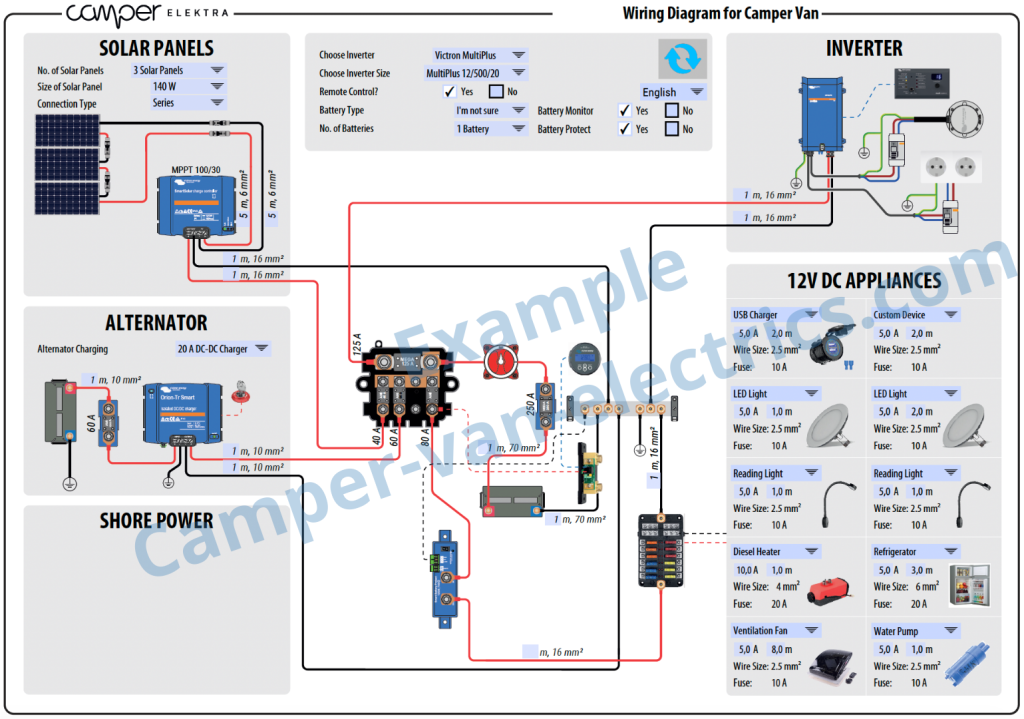
5. Our Electrical wiring diagram
The wiring diagram you see below is ours! And it consists of the following parts:
Hey! By the way… any links on this page that lead to products on Amazon are affiliate links and we earn a commission if you make a purchase. Thanks in advance – We really appreciate it!
Hello!
do you have also an 24V Version diagram avialable?
Hi!
No unfortunately only 12V